The Compete Guide to Pour Over Coffee: Myths, Facts, Tips, and More
Home > Blog > Brewmaster Tips > Pour Over Coffee > The Compete Guide to Pour Over Coffee: Myths, Facts, Tips, and More
If you are interested in making pour over coffee, we definitely encourage you to get the equipment and start doing it. You’ll save yourself a lot of money when you no longer have to go to the café to get a quality cup of coffee brewed in this method. And you’ll impress your friends with your skills.
So what is pour over coffee? What do you need to make the perfect cup (or pot) of pour over coffee at home? This article will answer these questions and more so keep reading and get ready to become the coffee master your friends will grow to envy.
The Science Behind the Best Pour Over
Before you learn how to pour over coffee, you need to understand the basics of what goes into brewing a cup of coffee, by any method. Once you know the underlying science to it, you’ll be able to tweak and modify your methods and techniques to coax the very best pour over coffee recipe for your taste.
The fact is, we don’t allow agree on what a good cup of coffee is. Some prefer dark roast, others light. Some prefer a more subtle floral flavor, others prefer a richer, more robust flavor.
If you know how the different parts of the brewing process work and what happens to your coffee at each stage, you’ll know exactly where you should experiment in order to fine tune a method that creates the perfect cup of coffee for you.
In other words, it’s not just about learning how to make pour over coffee but how to make your perfect cup of coffee. One of the advantages of a pour over coffee maker is simply that you have complete control over how your coffee is brewed so that you get your perfect cup every time.
With that in mind, there are three basic stages to any brewing method, whether it’s pour over or French press. Those stages are wetting, dissolution, and diffusion. Let’s look at each stage a little more in depth.
What is Blooming Coffee – Wetting
This first stage says it all in its name. This is when your coffee grounds get wet. As soon as the hot water hits your grounds, all the trapped CO2 inside its cells will be released. When watching your grounds in pour over coffee filters, you’ll be able to easily identify the bubbling and expansion that occurs at this stage.
When your grounds begin to swell up as bubbles of CO2 are released, this is referred to as the “bloom.” The important things to do at this stage include:
- Giving your grounds time to “bloom” after being wetted and before you pour the remaining hot water in because you want as much of that CO2 to escape as possible.
- Making sure you pour evenly so as to wet all the grounds instead of just pouring all of the water directly into the center.
- Trying to pour a consistent, even stream of water rather than splashing or dumping. A thin, non-stop stream at just the right pace that you can pour all of the water in one go rather than overflowing the filter and stopping to let it drain down a bit.
To help you execute the wetting stage properly, you can buy a special pour over coffee kettle which is designed with a specialized spout to help control the flow of the water. However, if you want to save money, just prepare to drink a few imperfect cups of coffee while you are still perfecting your pour technique.
What is Dissolution When Brewing Coffee
The next stage of the brewing process is dissolution. Once the grounds have become wet, they will begin to dissolve into the hot water. This dissolution unlocks all those wonderful, rich coffee flavors and aromas that you have come to love by releasing the molecules responsible for those flavors and aromas from the cells they were trapped in.
However, those cells are also filled with bitters and less pleasant flavors that try to come out with the rich flavors you are after. So you need to execute this stage well to maintain the perfect balance that allows all the good flavors through while stopping in time to keep out the unwanted bitters.
During the dissolution stage, you should be thinking mainly about timing.
- If the grounds do not dissolve into the water long enough, you will end up with watery coffee.
- If the grounds spend too much time dissolving, you will end up with a bitter tasting cup of coffee.
As a rule of thumb, after the roughly 30 second wetting phase, the grounds should be allowed to remain in dissolution phase for about 3-4 minutes, depending on a few other factors which we will discuss below.
This is another reason that the wetting phase is so important. By wetting the coffee before you start your full pour, you are letting CO2 bubbles escape. Those bubbles can trap the hot water in the grounds, causing the dissolution stage to be extended longer than you want and resulting in a bitter cup of coffee.
What is Diffusion When Brewing Coffee
During the diffusion stage, the process of osmosis occurs. This is the scientific term for the simple process of water flowing through the membrane of the cell and flooding out the concentrated oils so that what ends up in your cup is a rich liquid full of those aromatic oils that give coffee its distinct flavor. The effectiveness of this stage depends on a few factors:
- The fineness of your grounds. The membranes of finely ground coffee is easier to break through than more coarsely ground coffee.
- The temperature of your water. Hotter water can weaken the membrane and pull out the oils more quickly than cooler water.
- The time. The longer the water is in contact with the grounds, the more time it has to break through those membranes and release the oils.
These three stages are strongly interconnected. In order for one stage to go right, the previous stage must have been done right. However, “right” is very relative. It depends on what you are trying to achieve.
Not only do your personal preferences matter in determining what is “right” but the method you are using will determine what is best. Everything from the temperature of the water to the fineness of the grounds will be different for a pour over cup of coffee than it will be for a drip machine, French press, or cold brew.
The specific recommendations for pour over coffee will be discussed later when we look more closely at this specific method.
For now, you can be confident in the knowledge that you understand what should be happening at each stage of the brewing process and what you should be taking note of. This should also give you some sense of what elements you might try to modify to suit your tastes.
But before we can talk about how to brew pour over coffee, you also need to know more about what equipment is involved.
Pour Over Coffee Equipment
Now, many people incorrectly assume that because pour over coffee takes a little more work, it is a more complicated method. However, the opposite is true. It’s a surprisingly simple method.
As far as brewing methods go, pour over coffee is one of the most minimalist and simplified methods you can use. It is simplified in the sense that the equipment is stripped down to the bare essentials.
No part of the process is automated—well, unless you have an electric grinder. It is all done by hand. While, the equipment and basic technique are simplified but the overall process is a little more involved.
The “hard” work comes from the fact that you control every aspect of the brewing process. You decide what temperature the water is. You decide how coarse or fine the grounds are and how much coffee to use. You decide when and how much water to pour over your coffee grounds. You even decide how to pour that water.
These different aspects of brewing that you would normally not think about when using, say, a drip machine. So it’s not hard work in the sense that you will be physically exhausted after brewing a pot of pour over coffee. It’s hard work in the sense that you actually have to be very present and aware throughout the process. You have to make conscious decisions about each stage of the process.
For many coffee drinkers, this more aware morning ritual of coffee making is actually very enjoyable. It’s relaxing and rewarding. The resulting coffee tastes that much better because you nurtured it at every stage of the process.
So what exactly do you need to make a cup of pour over coffee? The answer depends on how much you want to spend and what you expect your equipment to do for you. Here’s an overlook of the different pieces of pour over coffee equipment.
We’ll identify which ones are absolute basic essentials and which you can get away with forgetting Although they do make the process a little easier.
Grinder
While you can get pre-ground coffee, that’s really not the best stuff to use with this method. Pre-ground coffee loses its oils (the stuff that gives it flavor) quickly. You want whole beans and a grinder so that you can grind fresh right before the brew, preserving the oils. It also gives you control over how they are ground so that you can use them for multiple brewing methods.
You can choose between a blade or burr grinder. Most coffee snobs are going to tell you to choose a burr grinder without question. And if you are doing really advanced level brewing, a burr grinder is essential. But when you are starting out, it’s fine to go with a cheaper blade grinder.
You can read more about the differences in our article that specifically talks about grinders. Whichever kind you choose, a grinder is a basic necessity. If you are getting pre-ground coffee, just stick with a drip machine.
Filter
Filters are equally essential. You don’t want those grounds to become sludge inside your cup. For one, that sludge will continue to diffuse into your coffee, eventually giving a more bitter taste. But mostly, you probably just don’t want to drink sludge.
When it comes to filters, you have two basic options: reusable or disposable. Disposable filters are usually made of paper which some people prefer because this is more effective at keeping the grounds out of the coffee.
However, some people note that the paper absorbs some of those oils that give your coffee its characteristic aroma and flavor. Reusable metal filters will not absorb those oils but it will let a little bit of sludge through.
Aside from taste and sludge-levels, there is an obvious difference in price. A reusable filter will cost a little more at the beginning but will save you money in the long run as you don’t have to replace it as long as you take good care of it.
Dripper
This is the device that channels the filtered coffee into your cup or carafe. This is not necessary for every pour over set. Some carafes are designed in a way that you can rest your filter directly inside it.
However, for brewing a single cup or for brewing with a pour over coffee stand, you will need a dripper. These are usually cone-shaped and either rest directly on top of the cup or carafe or are mounted on a stand.
If getting a dripper, make sure you buy it before you buy any filter(s). You’ll want to make sure you get a filter that can fit nicely into the dripper.
Carafe
The carafe is simply the pot that your brewed coffee drips into. If you are using a single cup method, you won’t need this but if you want to brew more than a cup at a time, you want something larger to drip into.
With the pour over method, you have two key equipment options in this regard. First, you can buy a specially designed for this. That special design means you can place the filter directly into it without needing a dripper.
The second option is to buy a stand and a dripper. In this case, you can take your pick of what you put underneath the dripper to collect your coffee. Read more about this below.
Pour Over Coffee Stand
The main job of a pour over coffee stand is to hold your dripper in place above the cup or carafe that your brewed coffee is brewing into. When choosing a stand, we recommend getting an adjustable one that allows you to raise or lower the dripper.
This gives you the flexibility to choose between brewing a single cup and brewing a larger pot. If you only intend to brew a cup at a time, you can get away with just the dripper and no stand. If you intend to brew only larger amounts, you can skip the stand and the dripper and just buy a pour over coffee carafe.
But if you want the ability to choose and easily adjust how much coffee you brew, a combination of dripper and adjustable stand is the best option.
Pour Over Coffee Kettle
You can simply heat water in a pot on the stove. And if you are really good at it, you can even make a good cup of coffee doing it this way. However, two of the keys to great pour over coffee is water temperature and a slow, controlled pour.
A pour over coffee kettle can help with both. The uniquely designed spout helps get that perfect pour. Plus, getting an electric one that allows you to set the temperature will take care of the temperature for you.
You can learn to control the pour on your own with practice using any kind of pitcher and a thermometer can help get you the temperature you need. However, a pour over kettle will give you a great cup of coffee even when your technique and precision are not at 100% yet.
Scale and Thermometer
These measuring tools add a level of precision that really makes the pour over method shine. The scale can help you precisely measure out exactly how much coffee you are using and the thermometer allows you to heat the water to precise temperatures.
Not only does this offer precision, it allows you to repeat your process. Once you land on a recipe and technique that produces the perfect cup of coffee, you will want to know exactly what you did to achieve it. These precise measurements will guarantee that you can recreate that perfect cup again and again.
So, while they aren’t strictly necessary in the sense that you can still brew coffee without it, they really do enrich the process and make it a lot easier to get consistently great results each time.
How to Brew Pour Over Coffee
Finally, it’s time to go through the basics of brewing a pot of pour over coffee. Here are the essential steps:
- Start heating your water. Experiment with temperatures between 175 and 205 Fahrenheit.
- Hotter water dissolves and diffuses faster, meaning you want a shorter brew time to avoid the bitters. But done right, hotter temperatures produce a more full-bodied brew.
- Colder temperatures dissolve/diffuse slower so you need a longer brew time to avoid watery coffee. Done right, cooler temperatures produce a lighter, more floral brew.
- Grind your coffee. You are looking for a medium-fine grind, about the texture of sand. Start with a ratio of 30 grams of grounds per 500 ml of water. Adjust the ratio to suit your preferences in terms of strength of brew.
- Place your grounds into a pre-wetted filter and gently shake to even out the bed. You can also use a stamper or otherwise press down to pack the bed but keep in mind that this will slow down the water which means a longer brew time so consider that during brewing.
- Wet the grounds. Pour just enough hot water over the grounds to wet them all. Then stop and let it “bloom” for about 30 seconds (or until it stops swelling).
- Continue pouring hot water slowly. Start in the middle and move outward in circles to evenly soak all the grounds. Try to maintain the flow as consistently as possible.
- Once the water is poured, allow it to drip for another minute or so.
- Remove filter/dripper. Swirl and serve.
Camping and Pour Over Coffee
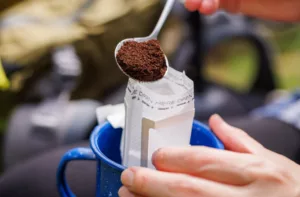
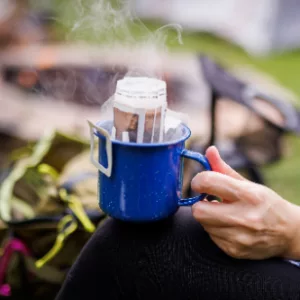 We designed the Nomads to be the best way to make pour over coffee while camping. They’re easy to pack, simple to store, and quick to use. No need to lug around a sizeable pour over device, along with separate filters. The Nomads will fit on mugs or cups up to 4.5″ wide, and provides as good a taste as any other pour over. Try a 10-pack of Nomads, and we know it’ll be one of your newest favorite camping gear.
- GOES ANYWHERE — Ideal backpacking coffee maker for camping pour over coffee. Single serve coffee filters are lightweight & portable; disposable and mess-free
- SIMPLE — Single serve coffee pour over is easy, fast and efficient. Just Anchor, Fill, Pour, Enjoy, and Dispose. Wide mouth coffee packets ideal for travel pour over coffee
- SAVE SPACE — These Single Cup Coffee Filters have a hanging ear-hook design that turns a cup into a coffee pot
- GREAT TASTE — Don’t settle for instant coffee. Take your favorite coffee with you
- MULTI-PURPOSE — Use as a camp coffee bag, coffee filter bags, coffee tea bags, Vietnamese coffee filter, or a simple one cup pour over coffee maker
Originally Published May 6, 2016
Revised March 21, 2023
Join COLETTI Loyalty Program for Rewards and Discounts
